Skip to content

2013

Upgrading a web app from ASP.NET MVC 3 to ASP.NET MVC 4

I recently had to update a web application from ASP.NET MVC 3 to ASP.NET MVC 4. Here are the the steps I had to go through to do that:

1) Update your project references. The easiest way to do that is to install ASP.NET MVC 4.0 from Package Manager Console:

Install-Package Microsoft.AspNet.Mvc

That will download and install all necessary components and will update your project references.

2) In your root Web.config, in <system.web> / <assemblies> section, update the assembly versions for System.Web.Helpers, System.Web.Mvc and System.Web.WebPages, i.e. replace this:

<assemblies>
    <add assembly="System.Web.Abstractions, Version=4.0.0.0, Culture=neutral, PublicKeyToken=31BF3856AD364E35" />
    <add assembly="System.Web.Helpers, Version=1.0.0.0, Culture=neutral, PublicKeyToken=31BF3856AD364E35" />
    <add assembly="System.Web.Routing, Version=4.0.0.0, Culture=neutral, PublicKeyToken=31BF3856AD364E35" />
    <add assembly="System.Web.Mvc, Version=3.0.0.0, Culture=neutral, PublicKeyToken=31BF3856AD364E35" />
    <add assembly="System.Web.WebPages, Version=1.0.0.0, Culture=neutral, PublicKeyToken=31BF3856AD364E35" />
</assemblies>

with this:

<assemblies>
    <add assembly="System.Web.Abstractions, Version=4.0.0.0, Culture=neutral, PublicKeyToken=31BF3856AD364E35" />
    <add assembly="System.Web.Helpers, Version=2.0.0.0, Culture=neutral, PublicKeyToken=31BF3856AD364E35" />
    <add assembly="System.Web.Routing, Version=4.0.0.0, Culture=neutral, PublicKeyToken=31BF3856AD364E35" />
    <add assembly="System.Web.Mvc, Version=4.0.0.0, Culture=neutral, PublicKeyToken=31BF3856AD364E35" />
    <add assembly="System.Web.WebPages, Version=2.0.0.0, Culture=neutral, PublicKeyToken=31BF3856AD364E35" />
</assemblies>

3) In Views\\Web.config, replace all instances of System.Web.Mvc, Version=3.0.0.0 and System.Web.WebPages.Razor, Version=1.0.0.0 with System.Web.Mvc, Version=4.0.0.0 and System.Web.WebPages.Razor, Version=2.0.0.0.

Those three basic changes were enough to get my web application running. Depending on your application you may have to do more changes. For a complete list of all changes that might be required, check out the upgrade section in the ASP.NET MVC 4 release notes.
PowerShell Prompt Here

I have been doing some scripting in PowerShell 3.0 lately and I found this post by Scott Hanselman. Just go to that post and download powershellhere.inf, right click on it and click Install. It will give you a nice “PowerShell Prompt Here” context menu in Windows Explorer.

Starting with Mercurial, BitBucket and SourceTree on Mac

This is a quick step-by-step tutorial on starting with Mercurial and BitBucket on Mac. This tutorial was done on Mac OS 10.8.2.

Install Mercurial

The easiest way to do that is to download and install the Mercurial 2.5.4 for OS X 10.8 binary package from the official Mercurial site. After downloading the file unzip it and open mercurial-2.5.4+20130405-py2.7-macosx10.8.mpkg.

Verify Mercurial Installation

Open Terminal and type hg –version.

hg --version
Mercurial Distributed SCM (version 2.5.4+20130405)
(see http://mercurial.selenic.com for more information)

Copyright (C) 2005-2012 Matt Mackall and others
This is free software; see the source for copying conditions. There is NO
warranty; not even for MERCHANTABILITY or FITNESS FOR A PARTICULAR PURPOSE.

Install Mercurial Keyring Extension

In Terminal:

sudo easy_install keyring
sudo easy_install mercurial_keyring

Next, add these lines to .hgrc (in your home directory):

[extensions]
mercurial_keyring =

Now Mercurial will store and use user credentials to/from the Mac OS keychain.

Configure BitBucket User

There are a few ways to do this, but the best is via [ui] and [auth] sections in .hgrc (in your home directory). Your final .hgrc file should look like this:

[ui]
username = Valentin Kantchev <youremail@<span class="oe_displaynone">null</span>yourdomain.com>

[auth]
bitbucket.org.prefix = bitbucket.org
bitbucket.org.username = yourusername

[extensions]
mercurial_keyring=

Install Atlassian SourceTree

Go to www.sourcetreeapp.com and download SourceTree for Mac. At the time of this writing the latest version of SourceTree was 1.5.8. SourceTree for Mac comes packaged as a dmg file – after you open the dmg file you install the app the normal Mac way – by dragging SourceTree.app into your Applications folder.

Configure SourceTree

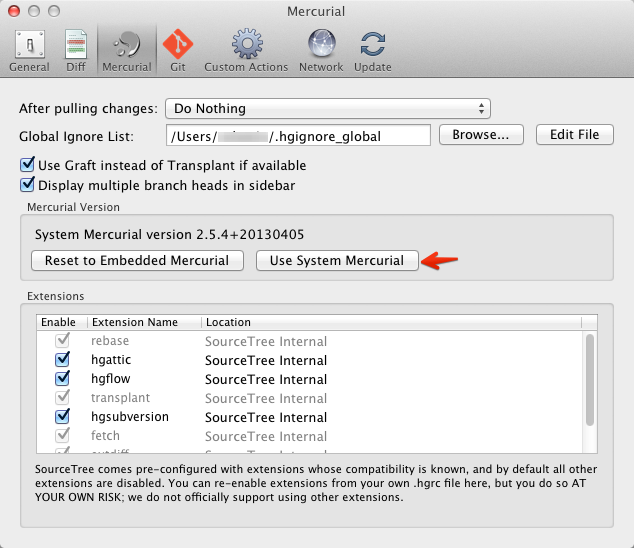
I recommend configuring SourceTree to use the system Mercurial. That way you get consistent Hg experience when working in Terminal and in the SourceTree GUI. To do that, run SourceTree and press “Command + ,” to open Preferences and then click Use System Mercurial.

sourcetree-preferences

Clone a BitBucket Repository

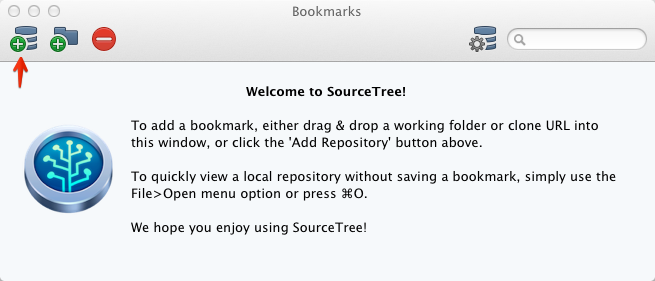
In the SourceTree Bookmarks window:

  1. Click on the Add Repository button.
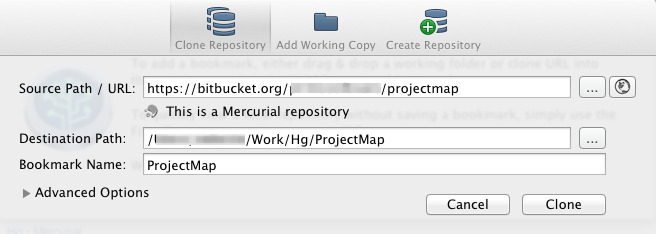
  2. Enter the remote repository url and the local repository folder.
  3. Click Clone

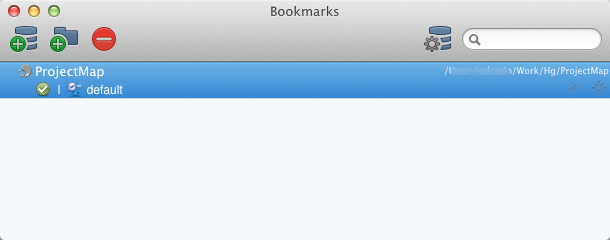
sourcetree-add-repository sourcetree-clone-repository sourcetree-repository-bookmark

Installing Mercurial and TortoiseHg on Ubuntu

This is a step-by-step guide on installing Mercurial and TortoiseHg on Ubuntu, and setting up a BitBucket account. This was tested on Ubuntu 12.04 LTS and Ubuntu 12.10.

Install TortoiseHg

Add TortoiseHg PPA (https://launchpad.net/~tortoisehg-ppa/+archive/releases)

sudo add-apt-repository ppa:tortoisehg-ppa/releases
sudo apt-get update
sudo apt-get install tortoisehg tortoisehg-nautilus

That installs Mercurial 2.5.1 and TortoiseHg 2.7.

Restart Nautilus

nautilus -q

Check installation

thg &

TorstoiseHg Workbench should open.

Configure user name for commits

thg &

Then select File | Settings from the top menu.

In the Commit section enter the username that will be used with commits.
The common format is: Full Name (e.g. Valentin Kantchev )

Install Mercurial keyring extension

sudo apt-get install python-setuptools
sudo easy_install keyring
sudo easy_install mercurial_keyring

Add these lines to the .hgrc (in your home directory):

[extensions]
mercurial_keyring =

That allows Mercurial to store and use user credentials in the Ubuntu keychain.

Setup BitBucket user (optional)

Add these lines to your global .hgrc (i.e. /home/valentin/.hgrc), change the username to your own:

[auth]
bitbucket.org.prefix = bitbucket.org/<myteamname>
bitbucket.org.username = <mybitbucketuser>

My final .hgrc looks like this:

# Generated by TortoiseHg settings dialog

[ui]
username = Valentin Kantchev

[auth]
bitbucket.org.prefix = bitbucket.org/<myteamname>
bitbucket.org.username = <mybitbucketuser>

[extensions]
mercurial_keyring =