Skip to content

Blog

Hg subrepositories: a how-to guide for the “svn:externals” junkie (Part 1)

This is the first post from a multi-part article about using Mercurial subrepositories when you are switching from Subversion to Mercurial and you heavily used Subversion subrepositories configured via the svn:externals property.

Often a common scenario in software development is to have a main project that depends on other projects. Here is an example of how the Subversion “trunk” for such projects might look like:

``` text svn://svnserver/SandboxSvn trunk SandboxSvn (main source code) SanboxDep1Svn (svn:externals link from svn://svnserver/SandboxDep1Svn/trunk) SanboxDep2Svn (svn:externals link from svn://svnserver/SandboxDep2Svn/trunk)

Basically we have a repository at *svn://svnserver/SandboxSvn* that includes the main project called *SandboxSvn* and two projects* SandboxDep1Svn* and *SandboxDep2Svn* on which *SandboxSvn* depends. The dependency projects are linked from two separate Subversion repositories, hosted at *svn://svnserver/SandboxDep1Svn/trunk* and *svn://svnserver/SandboxDep2Svn/trunk* respectively.

You can create a similar structure in Mercurial by using the Mercurial subrepositories. In the example below, I use BitBucket, so I can test my setup later, but the same steps should be valid for any other shared Mercurial setup. For more information on how to use BitBucket, see the [BitBucket 101](https://confluence.atlassian.com/display/BITBUCKET/Bitbucket+101 "BitBucket 101") wiki.

Steps to setup a main project with two dependencies in Mercurial:

1) Create a repository called SandboxRootHg. This will be a containerrepository for both the main project and the dependencies. I set that up at https://bitbucket.org/your-team-name/SandboxRootHg.

2) Create a repository for your main project, e.g. SandboxHg at *https://bitbucket.org/your-team-name/SandboxHg*.

3) Create a repository for each of the dependencies:

- SandboxDep1Hg at *https://bitbucket.org/your-team-name/SandboxDep1Hg*
- SandboxDep2Hg at *https://bitbucket.org/your-team-name/sandboxDep1Hg*

4) Setup the three dependencies in the container project.

You first have to clone the container repository locally to your machine. In our case the containeris *SandboxRootHg*, so I cloned that in a new*SandboxRootHg* folder. In the *SandboxRootHg* folder create a *.hgsub* file(note the dot in the*.hgsub*name), and add the *SandboxHg*, *SandboxDep1Hg* and *SandboxDep2Hg* projects to in the *.hgsub* file. Your final *.hgsub* will have three lines in it and will look similar to this:

``` text 
SandboxHg = https://bitbucket.org/your-team-name/SandboxHg
SandboxDep1Hg = https://bitbucket.org/your-team-name/SandboxDep1Hg
SandboxDep2Hg = https://bitbucket.org/your-team-name/SandboxDep2Hg

5) In the SandboxRootHg folder, do a Hg/Add to add the .hgsub file to Mercurial, then Hg/Commit. And last, do not forget to do a Hg/Push to update the remote shared repository with your changes.

Continue to Hg subrepositories: a how-to guide for the “svn:externals” junkie (Part 2).
How to configure TortoiseHg to remember your username and password

I have been playing with Hg (Mercurial) lately to see if it would be feasible to move our projects at Primo Software from SVN (Subversion) to Mercurial. The things I am looking at are not just the version control capabilities, but also the tools that are available on Windows, Mac and Ubuntu. As part of the tools evaluation I have been playing with TortoiseHg, which seems to be the recommended Hg visual tool for Windows.

This post here is about configuring TortoiseHg to remember the username and password and not ask you for those when you do Pull/Push to a remote repository. In the example below I use a Hg repository hosted on bitbucket.org, but the same configuration should be valid for any other remote repository.

After you first clone your repository with TortoiseHg you end up with this in your Hg configuration file (i.e. your .hg/hgrc file):

``` ini [ui] username = Valentin Kantchev myemail@primosoftware.com

[paths] default = https://myusername@bitbucket.org/primosoftware/projectmap

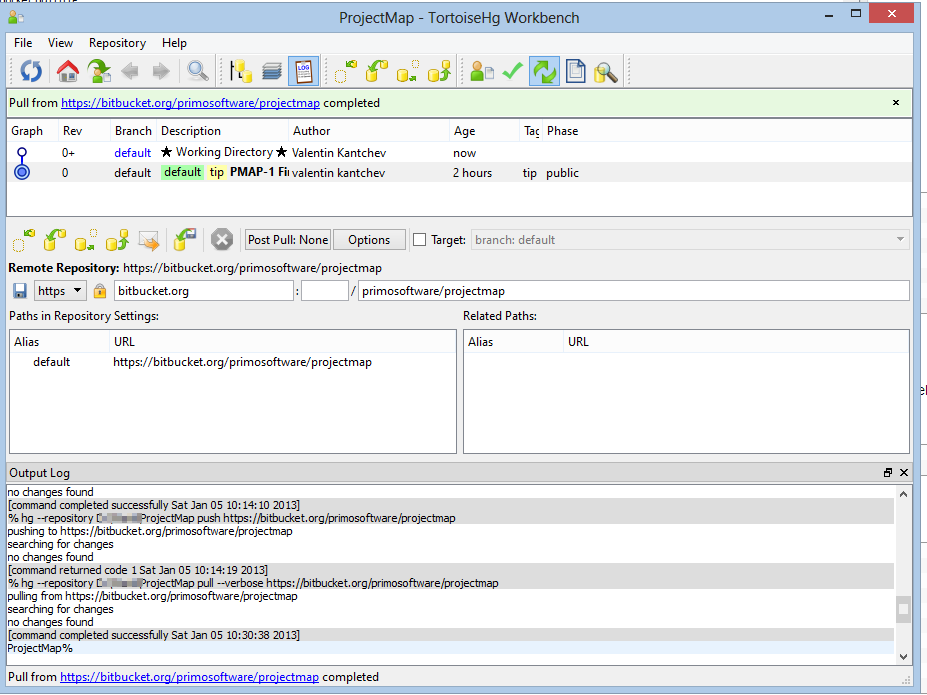
If you do Push and Pull from TortoiseHg it will take your username from the repo URL under the [paths] config, but it will keep asking for your password every time you do this.

![workbench_1](../assets/images/how-to-configure-tortoisehg-to-remember-your-username-and-password/workbench_1.png)

 One of the solutions to this is to set your username and password in the TortoiseHg synchronization view:

![workbench_2](../assets/images/how-to-configure-tortoisehg-to-remember-your-username-and-password/workbench_2.png)

 Now it’s all good, but to make this work TortoiseHg creates a file called mercurial.ini under your Windows home directory, whichs is normally C:\\Users\\yourwindowsusername\\. In my case the file had this inside:


``` ini 
# Generated by TortoiseHg settings dialog
[ui]
username = Valentin Kantchev <myemail@primosoftware.com>

[auth]
bitbucket.org.prefix = bitbucket.org
bitbucket.org.username = myusername
bitbucket.org.password = mypassword

The problem with this file is that the password is stored in it as clear text.

Fortunately there is an easy workaround for that: TortoiseHg comes bundled with a Keyring extension, designed for storing authentication passwords securely. However, the Keyring extension is not active by default. To activate it you have to add the following lines in your mercurial.ini file:

[extensions]
mercurial_keyring=

You can delete the password line under the [auth] section completely as it is not needed at this point. Your final mercurial.ini file should look like this:

# Generated by TortoiseHg settings dialog
[ui]
username = Valentin Kantchev <myemail@primosoftware.com>

[auth]
bitbucket.org.prefix = bitbucket.org
bitbucket.org.username = myusername

[extensions]
mercurial_keyring=

Now you can also remove your username from the repository URL. In the .hg/hgrc file in your local repository folder, change this: https://myusername@nullbitbucket.org/primosoftware/projectmap to this: https://bitbucket.org/primosoftware/projectmap

Your final .hg/hgrc file should look like this:

[ui]
username = Valentin Kantchev <myemail@primosoftware.com>

[paths]
default = https://bitbucket.org/primosoftware/projectmap

This completely removes all authentication info from your local repository folders. Your password is now stored in the Keyring and your user name is stored in C:\Users\yourwindowsusername\mercurial.ini. This way, for example, if you zip your local folder to send it to somebody you cannot accidentally send your source control authentication information with it.

Please note that after all changes TortoiseHg might ask you one more time for password. After that it will store and use the password from the Keyring.

Here is the last TortoiseHg screenshot. Notice that there is no authentication information visible anywhere:

workbench_3

Import a SQL dump from one schema into another with MySQL Workbench

When restoring a MySQL dump from MySQL Workbench, currently it is not possible to specify a different schema than the schema used during the export. The workaround for that is to edit the dump file (which is just a text file) in a text editor and change the name of the schema manually.

For example to change the schema name from ‘old_schema’ to ‘new_schema’, open the dump file in a text editor and change these two lines:

CREATE DATABASE  IF NOT EXISTS 'old_schema' /*!40100 DEFAULT CHARACTER SET utf8 */;
USE 'old_schema';

to this:

CREATE DATABASE  IF NOT EXISTS 'new_schema' /*!40100 DEFAULT CHARACTER SET utf8 */;
USE 'new_schema';

After that, import the dump file using MySQL Workbench as usual. Please note that if you exported the old schema with qualified identifiers you would also have to search and replace the schema name everywhere in the dump file, otherwise each object would have the old schema name as prefix.